On Discovering Self

"Walk in Peace... Learn from Nature... Find Yourself...
"

Tuesday, August 27, 2013

On The Value Of Backyard Bushcraftin'

    There is just something that is always adventurous when it comes to spending time with my bush buddy Christian. He is all of nine going on twenty and keeps me thinking young. He challenges me and helps me to see that bushcraft and being in the woods is all about being a kid.
    We all know that kids don't have a lot of fun if they are uncomfortable or feel left out or are left alone with their own fears and doubts. So if being in the woods and having fun is like being a kid, and getting in some dirt time is also about being a kid, then it presumes that we are getting comfortable with the bush.
   That is why I do not underestimate the power of the back yard when it comes to bushcraft. It is a taste of the familiar, with a mix of the wild and it works as a place to practice and walk thru the rite of passage into the wilderness. It just takes some imagination and most kids have it in spades.
   A kid just gets really only one "first time" to sleep out under the stars, before he realizes that the next time he does, it won't be his first. It will just be another night, maybe special in its own right, but not like the first. So it was with that in mind, I decided to build a small fire pit in my backyard, line it with some rocks and sand and begin to setup a camp.
   I was going to ready the camp for Christian's first night out under the stars and to spend some time with me bushcrafting, cooking, whittling and in general just having some boyish fun. I knew he was going to like it.
   As I said, I started with making a fire pit, which looks something like this...

 
 I had gotten the fire going with my bow drill set, as I figured it is the first fire in the pit I would start it with something special. Here is the bow drill set I used, a little basswood on basswood...


Then I started on some water to heat up for a good cup of tea which seemed like a good idea...


I used my stainless steel "Little Jon" grill which was made by a good bushcraft friend of mind that knows his welding. Next I put together a pot hook and setup one half of a USGI canvas shelter or "pup" tent...


After making final arrangements to pick up my bush buddy, we went out for a hike along some local trails and then returned to the backyard to cook up some good food for supper. We made vegetable shish kabobs and chicken fillets...


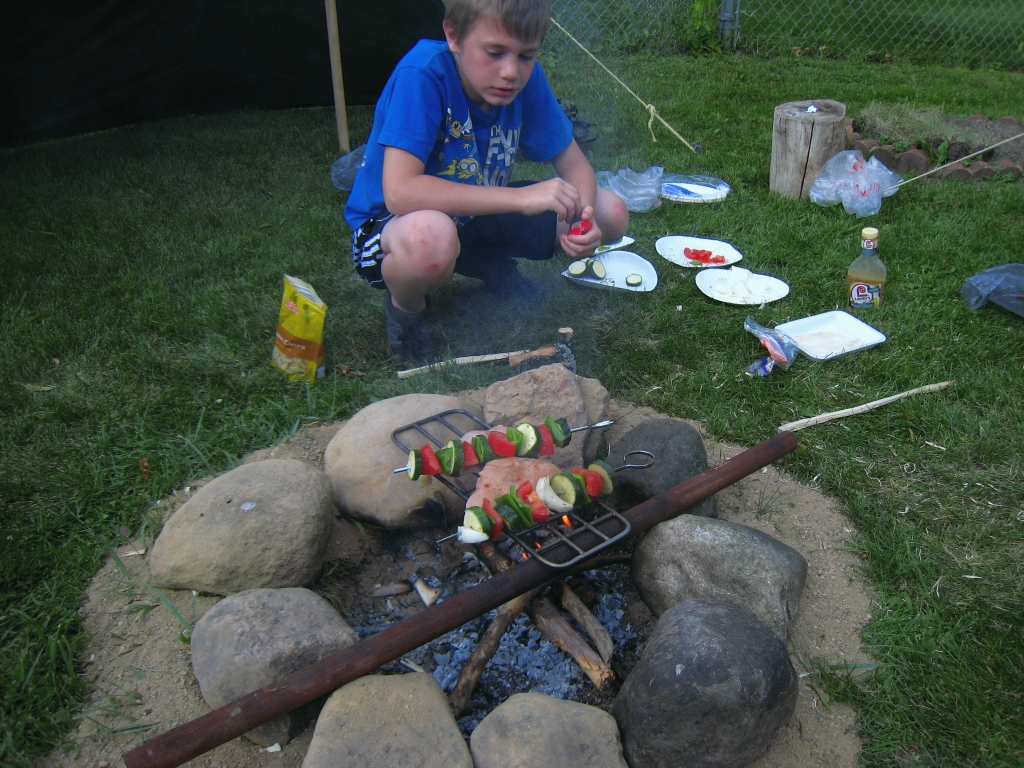
The chicken was looking fine...


After a pleasant evening and eating and chatting and telling stories, we both settled into our open shelters for the night. The temperatures got down to about 53°F and there were very few mosquitoes.
My bush buddy tried to sleep in, but I got him roused and awake for breakfast. He seem to roll off of his mattress pad during the night and got a little cold, so I wrapped him up in my wool blanket...


 We soon had the fire revived and hot water on to boil so we could make some cocoa and hot oatmeal for breakfast. He decided he wanted Campbells Double Noodle soup instead, go figure, but the pot hook worked great with the 10cm Zebra Billy can...


   In the end, it was a great time and we grew closer together. I know this will be something we will do again and again and as he gains confidence, we will be able to make that transition to the woods and the wilds and who knows, someday he may just decide to make a solo trip of his own and begin to learn the things that I have learned and to feel the kinship with the landscape and to begin to feel at home with the wilderness wherever he may go. I want him to feel the things that I have felt and to someday, share those with his son. Then I know I will have done him right.

   As the saying goes...

    A USGI Shelter Half... $20
    A 10cm Zebra Billy can...  $30
    Spending a night out under the stars with my son... priceless.

Until next time, Happy Exploring.

Monday, August 12, 2013

On Lessons In Knife Sharpening: The Mora Flat Scandi Grind

   If you have followed my blog as of late, you will know that I have recently been attending a few meetups at the Hyland Lake Park Reserve in Bloomington, MN hosted by my good friend and brother in bushcraft, fellow BushcraftUSA member, Shonuffisthemaster.
   I soon learned after a few meetings that Sho' has a particular knack for getting a scary sharp edge on his knives, and especially the beloved Mora.
   The Mora knife has a wide and flat scandi grind that lends itself perfectly to being sharpened on a flat grinding stone, such as the Japanese water stones.
  Eventually, Sho' and I talked about how he wanted to create a few videos that would cover the basic processes of sharpening knives, and that he wanted to start with the Mora and the scandi grind.
   So on our last outing together, we started on making the first video in what I hope will be a series of very practical lessons on knife sharpening.
   My good friend Sticker and I got together on that Sunday, to head up to the cities to spend some time at the park reserve and it was also the first time that Sticker and Sho' met.
   As you can guess, most of the skills practice was about knife sharpening. We did get out for a hike and some wild edibles foraging and later did some practice with constructing some figure four deadfall traps.
   Here is the video trip report and a shortened version of Sho's knife sharpening lesson, which is actually about 27 minutes long and can be found here, Knife Sharpening Lesson 1


   I heard later from Sho' that another member of BushcraftUSA, that lives in or near the Twin Cities, had seen this posted video on the BushcraftUSA Trips and Expeditions section or Minnesota section and decided to join him and his friend on their recent Saturday get together. So I guess the videos are having a great effect on getting some members going out for some skills practice.
   Well I hope you enjoyed the video and I look forward to sharing my next adventure with you all. Until next time, Happy Exploring.
  

Monday, August 5, 2013

A Simple Sheath For The SAK Farmer

   It is not very often that I get the chance to blog about a project that really adds to the utilitarian nature of my kit, but recently I put together a knife sheath based on a design presented by IA Woodsman on the BushcraftUSA forum site. Here is a link to that post and the video of his DIY-SAK-Farmer-Pouch-Sheath .
   I had acquired a long piece of a seat belt as a discard from a vehicular extraction training exercise that was held during our Fire School training weekend at the college where I work. So this project was a perfect way to use that webbing. It just seemed like I had all the right pieces, so I set to work on it.
   Before sharing the photos of my finished project, I have to share that of all the knives I own, I seem to get the most our of my SAK Farmer. It is about the most used tool I have in my kit when I am out and about in the wilderness.
   I am not saying this by any means as an outright endorsement or knife review per se, but simply stating that it is hard to go wrong if you choose a SAK Farmer for your bushcraft kit. I use the knife blade for all kinds of fire prep and carving needs and the saw blade for harvesting all manner of woods for various projects, and the awl is near perfect for drilling holes and using with my fire steel to get sparks and an ember going in my tinder bundle.
   The SAK Farmer has been a long time friend for me in bushcrafting and for that reason it holds a special place in my kit. So it only seemed fitting to make a sheath for it to make it easier to get to and to add even more function combining it with a lanyard and fire steel for fire making.
   I used the seat belt webbing for the main body of the sheath, one of the seven core strands of an eight foot piece of paracord for the whipping and stitching and a three sided sail cloth needle to push thru the three layers of material. Also the metal "D" ring was welded up and made by a friend of mine who used some O1 tool steel, because he was out of stainless, so now with the right piece of flint it throws a few sparks. The "D" ring will work perfect to hold the lanyard for my fire steel that will go in my pocket, while the knife sheath goes on my belt. What a nice addition to the mix.
   Here are a few photos of how the project turned out.

The finished sheath...

The knife length for comparison...

Tucked away and a view of the belt loop...

   The belt loop is just wide enough to accommodate a wider pack frame waist belt if needed or even a USGI canteen belt.

   I think it turned out pretty good and as I understand it, this little project may be one of the next electives offered for the BushclassUSA classes. I guess that means I have the elective done now, I hope. Until next time, Happy Exploring.